Blog Hop winners
Jeannie - Creative Paperclay® from Creative Paperclay® blog
Mary S-from Amazing Mold Putty blog
Tumbling Trails-Creative Paperclay® from this blog
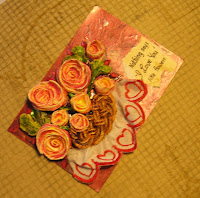
Basket of Roses Postcard with Amazing Mold Putty and DelightTM
by Sandra Strait (aka molossus)
The Creative Paperclay® Design Team is having a blog hop! It's my first ever, so I'm really excited. If you arrived here from Susan Brown's SBArtist: Painting in the Dark blog, you are in the right spot. If not, you might want to go back and start from the beginning at the Creative Paperclay® blog.
There's Blog Candy! One winner from both the Amazing Mold Putty blog and the Creative Paperclay Blog will receive a 16oz package of Creative Paperclay® and package of Amazing Mold Putty. For a chance to win (U.S. only, sorry), just leave a comment on all blogs and become a follower of all blogs on the hop. .
I am also giving away an 8 oz package of Creative Paperclay® or a package of Delight to one of the people who comment on my blog. (This prize is open to all but because of weight and postage, I'll substitute a 3 oz pack of DelightTM if the winner is international.).
I am also giving away an 8 oz package of Creative Paperclay® or a package of Delight to one of the people who comment on my blog. (This prize is open to all but because of weight and postage, I'll substitute a 3 oz pack of DelightTM if the winner is international.).
For my project, I made a postcard to send to my husband on our 30th Wedding Anniversary. I’ll be out of town (wah!), so I wanted something special for the occasion.
Supplies: Rolled Paper Rose 2-3 ft. of 1/8 in Diamond Braid rope A piece of lace for tablecloth A Postcard A scrap of paper with the sentiments "Nothing Says 'I Love You' Like Flowers" written on it. White Glue Acrylic paint and brushes A toothpick or two Scissors |
The Rope: I cut off three pieces of rope around an inch long, but of slightly different lengths, to be used as flower stems. I tugged the strands at one end to fray them, so they’d leave a texture when I made my mold. With the rest of the rope, I tied an Ocean Plait knot 2 ¼ inches long by 1 ½ inches high. (Don't know how to tie an Ocean Plait knot? There's a quick and easy template here-but be sure to come back for the rest of the hop!) |
I made four molds for this project—two for the roses; one for the leaves and stems; and one for the basket. Amazing Mold Putty comes in two parts, Part A--white putty and Part B--yellow putty. Nothing happens until you start mixing the two. Once you start smooshing them together though, you only have 3 or 4 minutes before the putty sets.  For each mold, I scooped equal amounts of Part A and Part B and eyeballed the amounts next to the object(s) I was going to mold. For each mold, I scooped equal amounts of Part A and Part B and eyeballed the amounts next to the object(s) I was going to mold. Once I felt I had enough I smooshed them together until the putty was all yellow with no marbling, then f flattened the ball out to the needed size. The last step was pushing my rope, knot or flower into the soft putty and to leave it there for 10-15 minutes. |
The DelightTM  DelightTM dries lighter and whiter than Creative Paperclay®, but either can be used in this project. The DelightTM will be cheaper to send if you intend to snail-mail your postcard. DelightTM dries lighter and whiter than Creative Paperclay®, but either can be used in this project. The DelightTM will be cheaper to send if you intend to snail-mail your postcard. The next step was to add the DelightTM to the molds. You get the best effects if you leave the DelightTM in the mold for a day or so, but I needed 5 small roses and 3 large ones, so I admit it. I let the DelightTM set for a couple hours, and then very carefully worked it free, so I could add more. |
Finishing I did wait a day before trimming off the excess bits of DelightTM with scissors and painting. During that time, I painted a background on the postcard. I used white glue on the lace, then the basket, then the stems and then the flowers. Then I added the Diamond drops and sentiments and my card was done! |
Don't forget to leave a comment on my blog, to be entered for the great blog candy. From here, you'll be visiting Peg. |
LINKY:


it compliments, appeals to a lot to me
ReplyDeletewell done gorgeous
ReplyDeleteBeautiful!
ReplyDeleteVery pretty! I am sure your hubby will love it!
ReplyDeleteThat is a super Valentine card! I'm sure that your hubby will love it.
ReplyDeleteHugs XX
Barbara
Very pretty!
ReplyDeleteWhat a fun blog hop. Thanks for shairng your project.
ReplyDeleteJody
beautiful!!!!
ReplyDeleteSuper project Sandra! I love molding fibers...the mold putty just really picks up the detail--it's amazing!!
ReplyDeleteGreat tutorial! Easy to follow :)
ReplyDeletegorgeous!
ReplyDeleteWow! Beautiful post card.
ReplyDeleteI'm nearly finished the hop and am afraid I won't be eligible for the prize drawing b/c blogger seems to be having issues w/Barbara and Creative Paperclay's sites tonight. :(
Beautiful card! I love it!
ReplyDeleteWhat a beautiful card! Thanks for the tut!
ReplyDeletesee article
ReplyDeletehttps://addictedpaintbynumbers.com